Front Suspension struts are a very important part of your overall suspension system – and if they wear out you can lose damping performance resulting in an unpleasant, and potentially dangerous, ride.
Here’s the process of replacing front suspension struts on a 1999 Fiat Ducato based Hymer motorhome:-
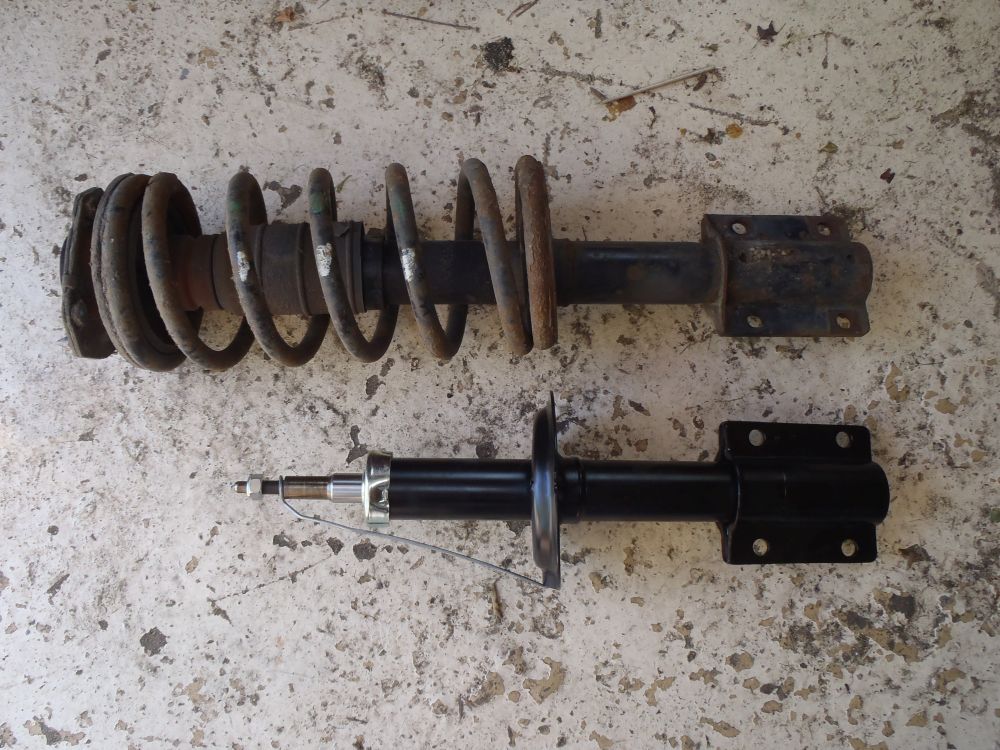
This is the bit we are tackling – the vertical strut (complete with suspension coil spring) that is fixed to the hub carrier at the bottom and the van body at the top:-

As you can see here one of mine had developed an oil leak. If this was left too long the damper could lose all of it’s oil and as a result all of it’s damping ability!

It is a good idea to replace the front suspension struts in pairs – to ensure consistent damping performance on both sides.
The first job is to unbolt the suspension strut from the hub carrier. It is held on by four large bolts that go into the rear face of the hub carrier:-
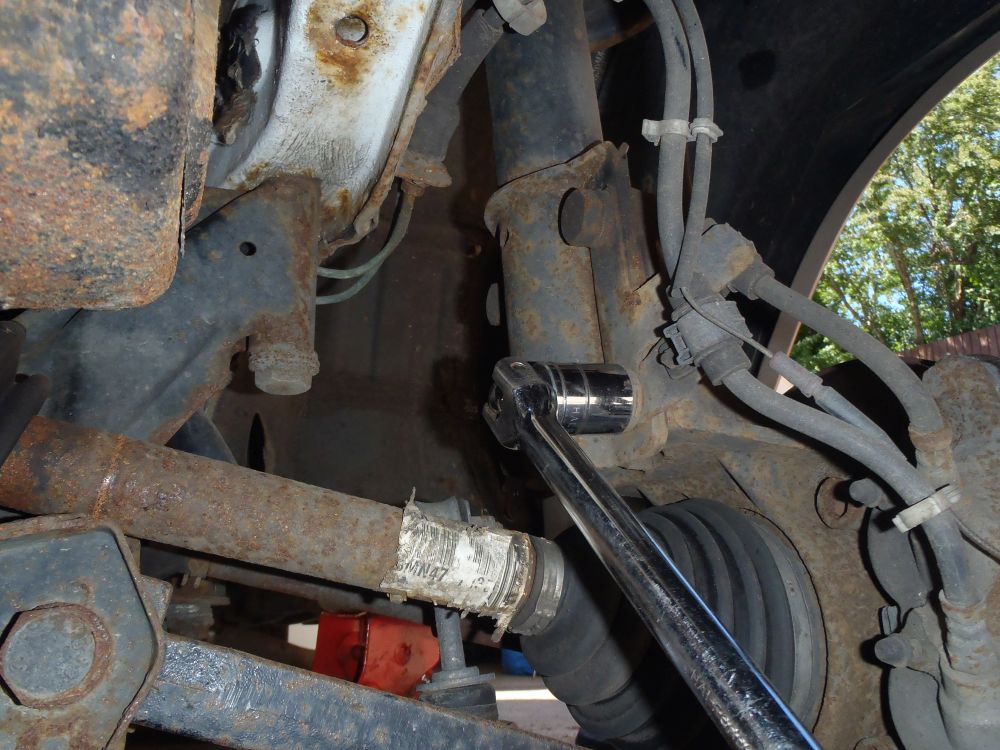
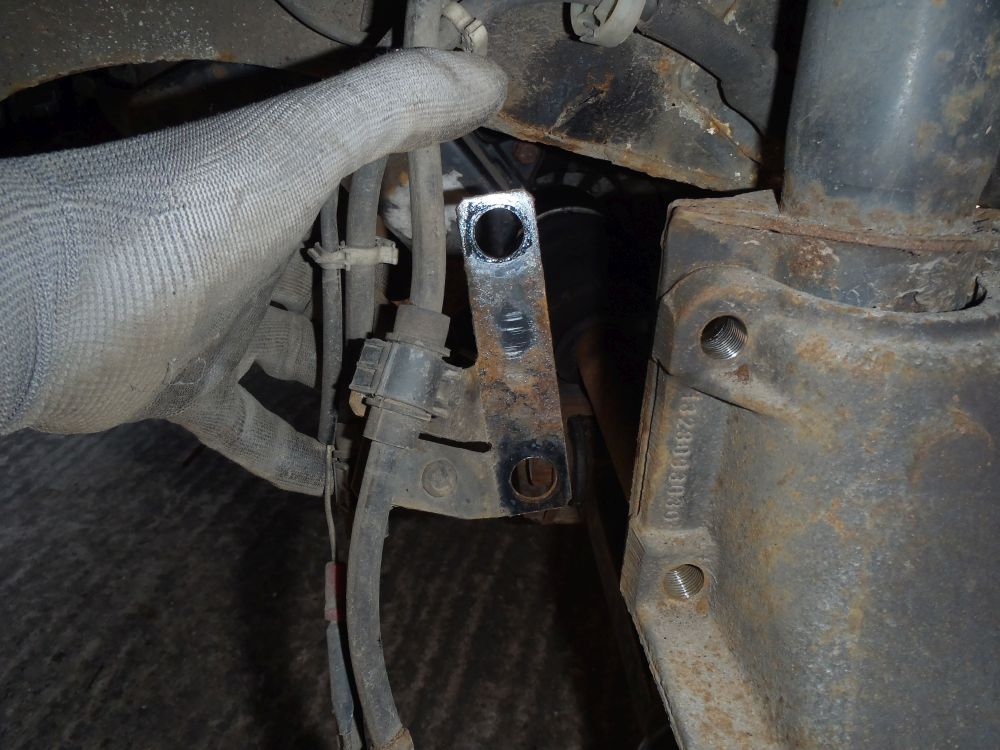
You will also find that the front set of bolts also hold this bracket that supports the hydraulic brake lines:-
With the bottom end of the suspension strut free we can unbolt the top end – to do this we have to get to the top mount underneath the dash from inside the cab. First job is to remove this piece of trim so we can see what we are doing:-
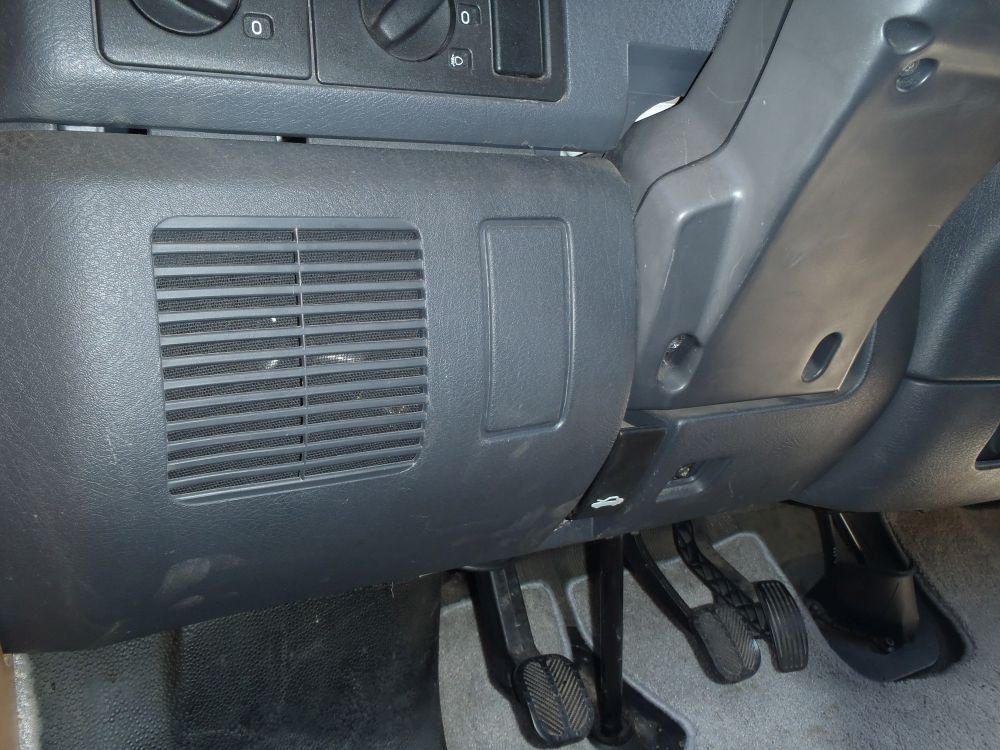
Note – my van is left hand drive in case you are wondering why everything looks back-to-front! Either way it’s the trim piece in this position that you will need to remove
With the trim out of the way you will be able to see the top mount, which should look something like this:-
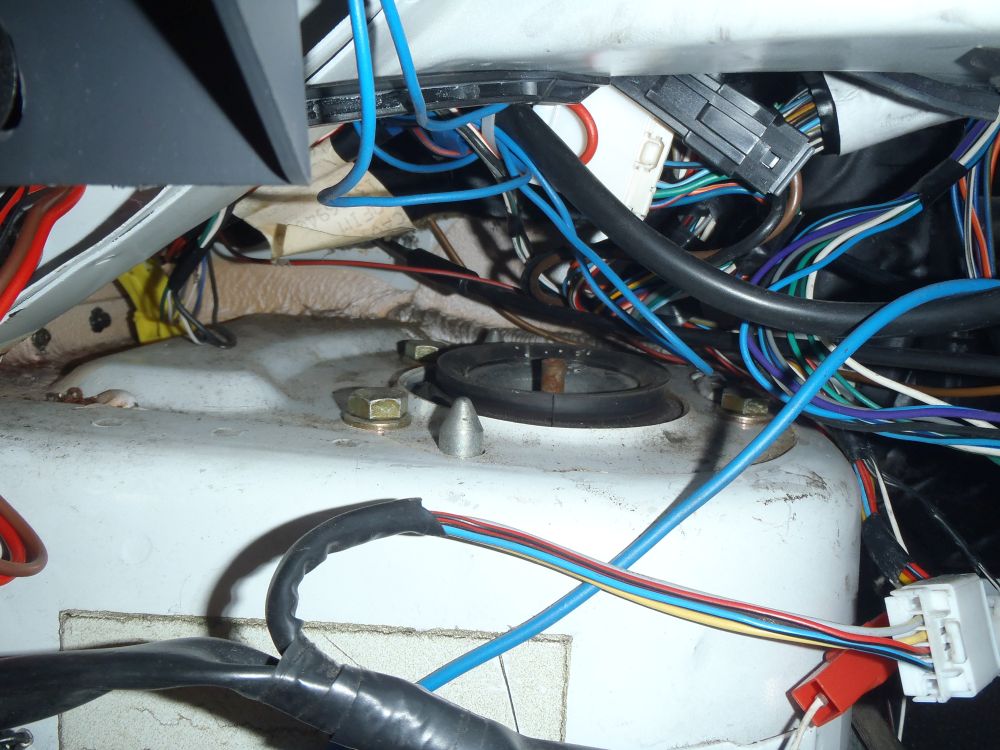
The strut is held in place by the three bolts going down vertically down into the top of it (notice also the two pins with the pointy tops – these are just locator pins to help you get the strut correctly aligned when you install it)
With the strut removed you should have something like this – old strut on the top, new replacement underneath:-
As you can see we need to swap the coil spring and top mount onto the new strut. If you have a broken spring you can follow this same process to fit a new one, but mine are OK so I am reusing them.
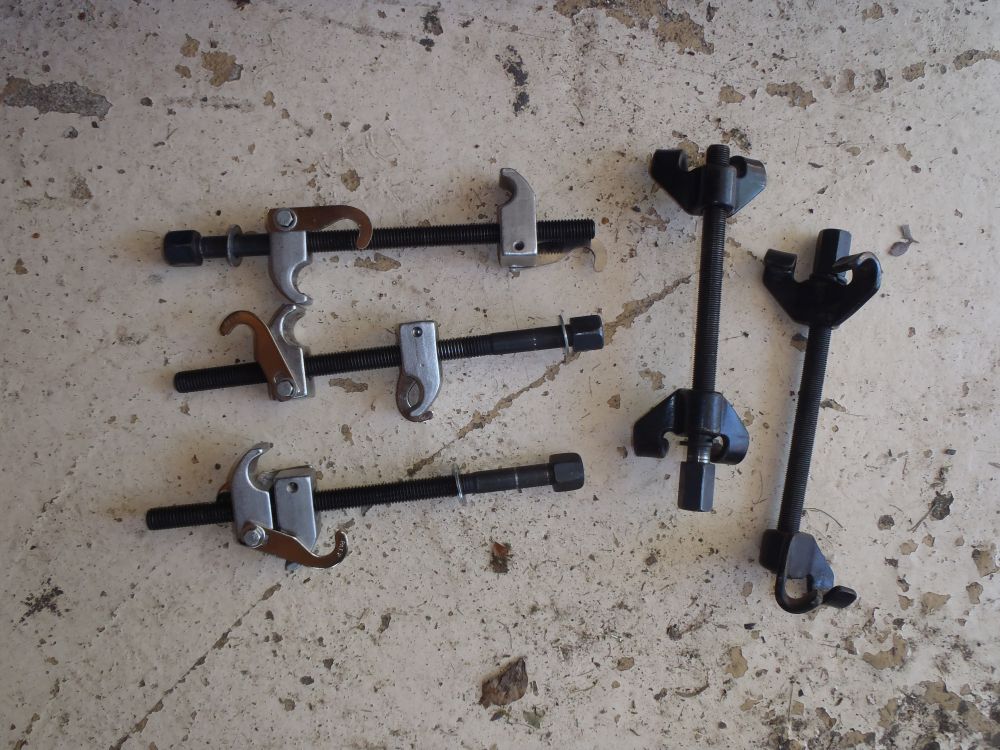
Next job is to compress the spring to take the load off the top mount so it can be safely removed. You will need some coil spring compressors, something like these (one of other of these two sets will work, I just happen to have a couple of different styles of spring compressors):-
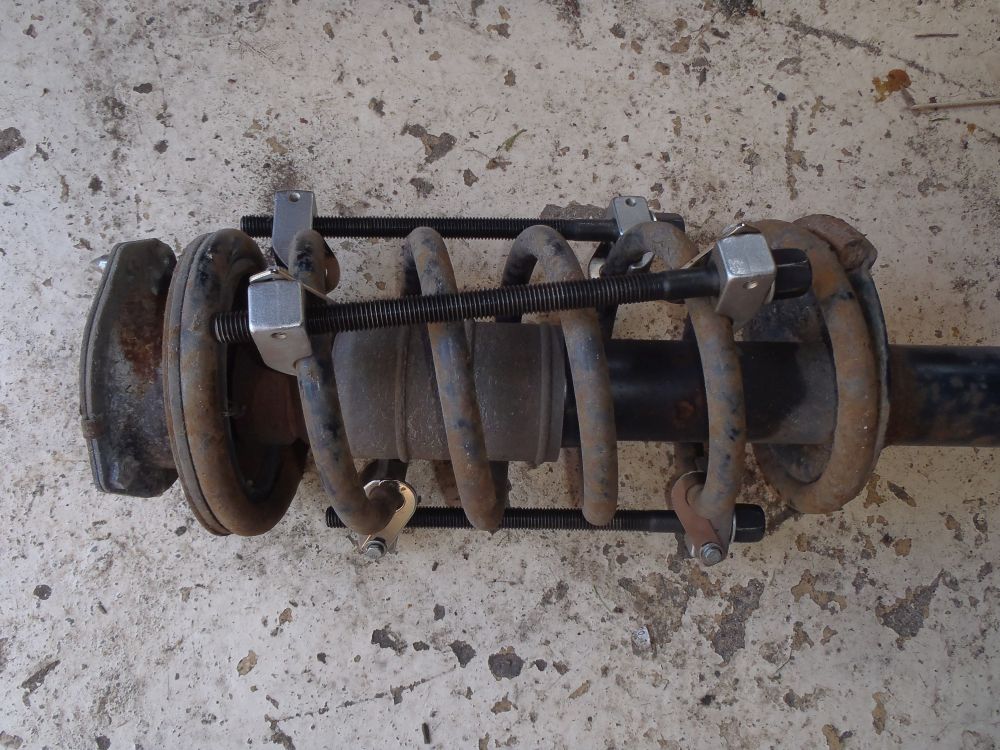
The aim is to compress the spring enough so it is just free of the seat at either end – slowly and carefully tighten up the spring compressors evenly until the spring is compressed enough. Warning! – there is a hell of a lot of energy stored in the compressed spring, so if something gives way it can be very dangerous! – wear appropriate safety equipment and only tackle this job if you are sufficiently confident/competent!
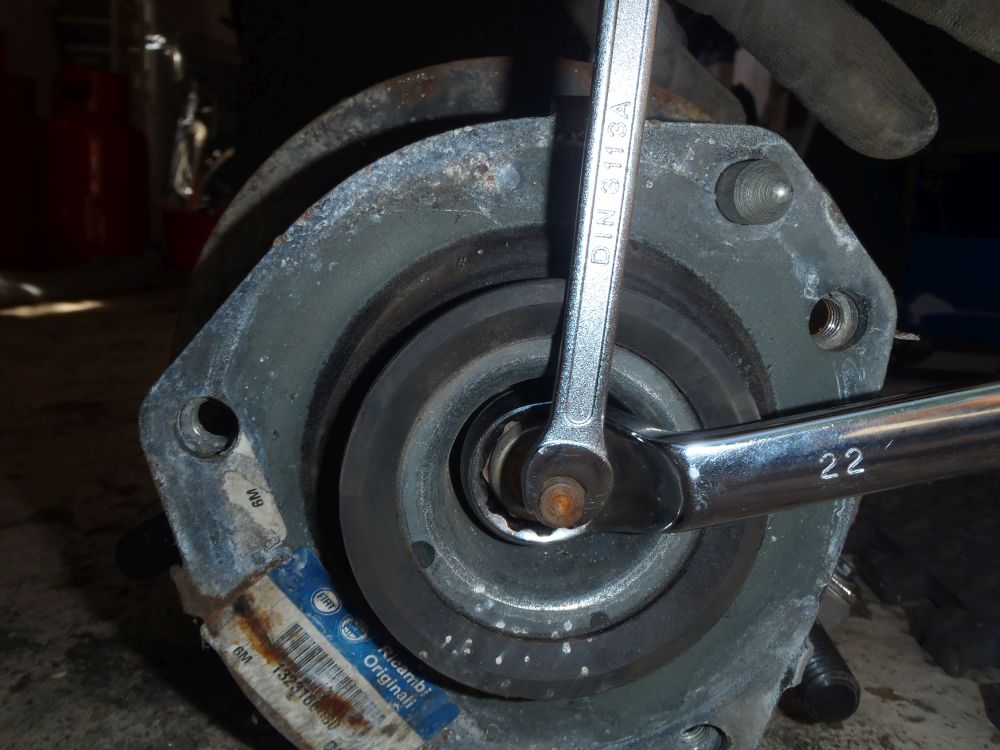
Once you have the spring compressed you need to undo the central nut on the top mount:-
If you just try and undo this the whole damper shaft will just rotate instead of the nut coming off, so you need to grip the the flats at the top of the shaft while you undo the nut (an offset ring spanner is needed here to get into the nut as it is recessed inside the top mount):-
If the suspension strut is very old it can be quite difficult to grip the shaft tight enough to break the nut free. Sometimes you will get lucky but if it is giving you problems an impact driver can sometimes rattle it loose, or you may have to resort gripping the chrome shaft of the damper with vice grips or similar to hold it. Note – do not use this method if you are planning to reuse the strut! – gripping the damper rod will damage the surface which will then ruin the seals in the damper!
With the top mount off you will see this large ring bearing – this is what the strut rotates on as the wheels steer:-
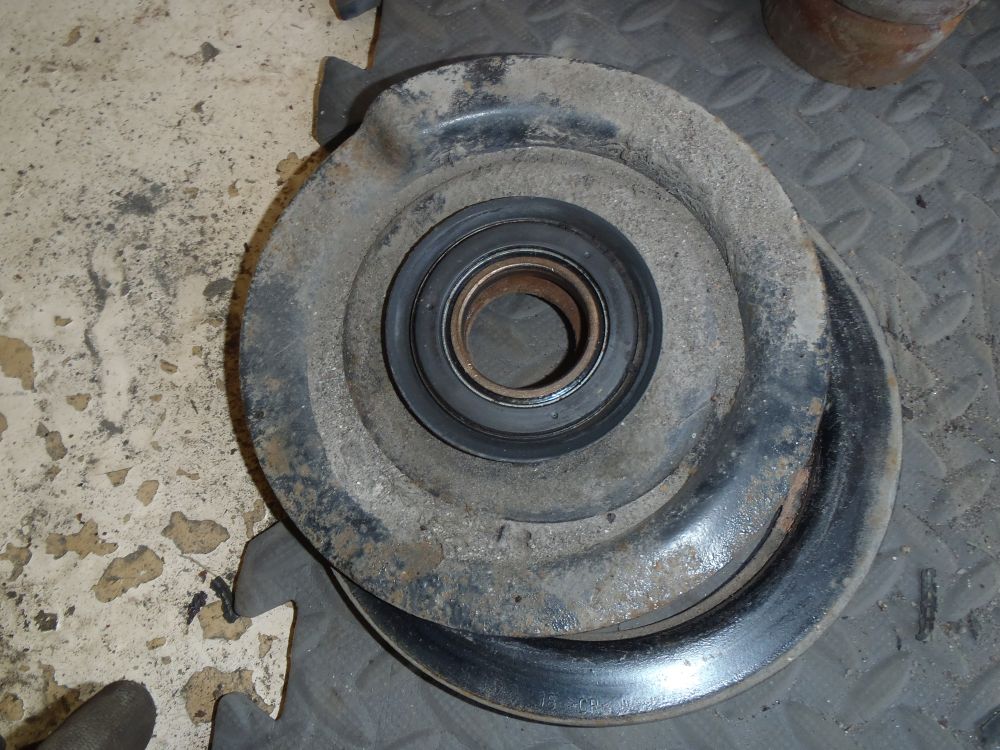
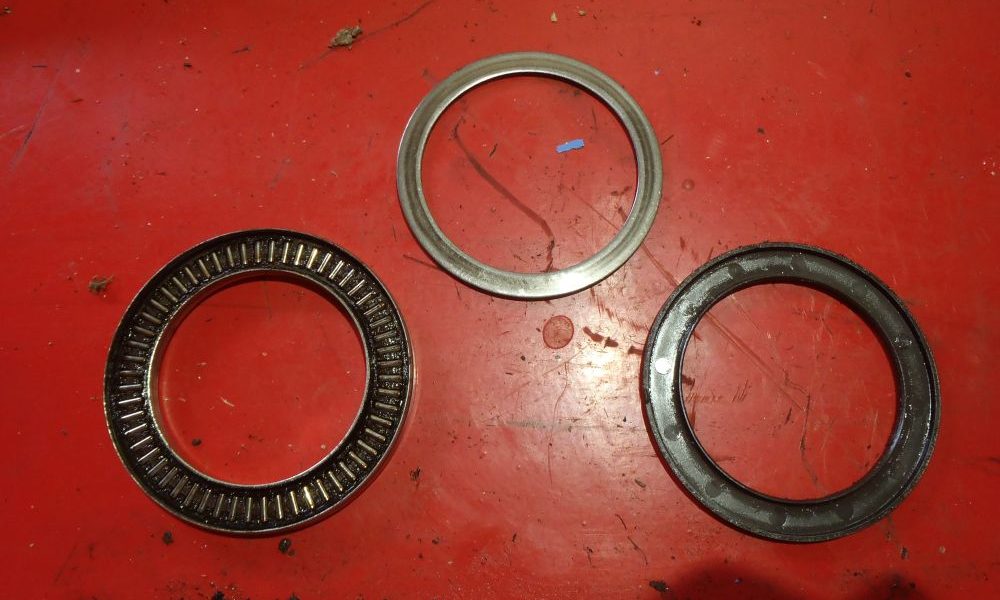
Now is a good time to check if it rotates smoothly – if it is seized or has very sticky points as it rotates you might as well replace it while everything is apart. You can also dismantle and regrease the existing bearing if you want, but be careful as if you removed the little pressed metal support that holds the roller bearings in place they will all fall out, it’s easy to lose one and it’s fiddly to get them all back in again! This is what the bearing looks like inside:-
With the strut top and spring removed from the old strut you will find a combined dust cover/bump stop on the top of the damper shaft, as you can see from this image mine had seen better days!:-

These are cheap and easily available from the usual sources, but when my replacement arrived it looked this this, as you can see the bump stop section is definitely the wrong size (despite being the right part for my van according to the listing!):-
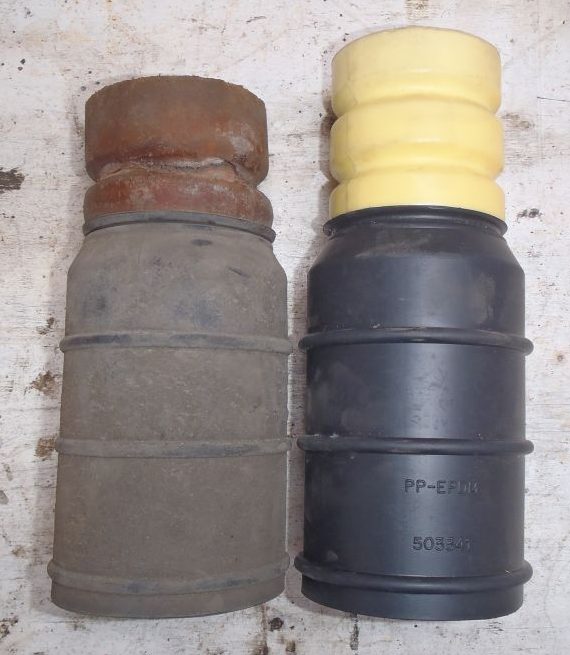
Looking on line it appears the vast majority of the parts available are this larger bump stop design, which is presumable for a different variant (perhaps the lower payload version?). I did eventually find a Febi Bilstein part (part no. 36308) which is correct for my van:-
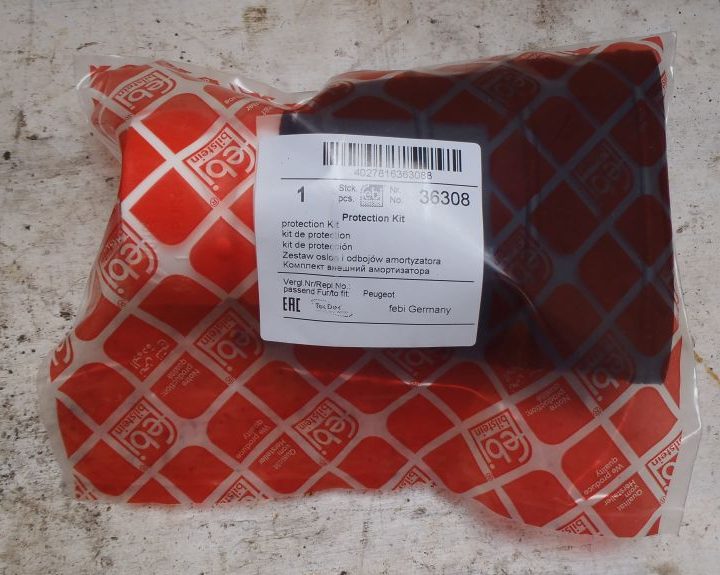
Here are all three side by side, new Febi part on the left, old one in the middle and incorrect new part on the right:-

Now it is just a case of putting everything back together – reassembly is the reverse of removal!
- Slide bump stop onto new strut
- Install coil spring (with spring compressors still on)
- Install top mount and tighten central nut
- Remove spring compressors (make sure spring sits in correct position on strut spring seat/top mount – there is a notch that the end of the spring goes up against, it should be obvious!
- Install strut in vehicle, install and tighten top mount bolts
- Install and tighten strut to hub carrier bolts
It is useful to have an assistant handy for the install as then can feed the strut in from below while you are inside the cab to install the top mount bolts.
Make sure all fasteners are torqued up appropriately – you can find a list of a lot of the Ducato torque settings here
If you feel like refreshing suspension bushes, ball joints etc. while you have everything apart take a look at my article about that here
Hope this helps! – and questions or comments let me know below!

September 23, 2019 at 3:09 pm
Could you please tell me where you ordered all the parts been looking for ages thanks
September 24, 2019 at 11:54 am
Hi Paul – I tend to get my parts from various sources – the ones I use most are eBay, carparts4less.co.uk and onlinecarparts.co.uk. Hope this helps, Cheers, Dan
October 15, 2019 at 1:37 am
Hi, thanks for this very helpful info.
I am just about to do a complete upgrade on my moho front struts which are exactley the same as yours. I have brought all new componants including uprated springs. I am not going to dismantle mine just swap them over once I have built the new units up. However on 3 videos I have found on the net 2 show the bearing installed as it is shown in your pic (the black side with the 3 little dimples upwards) but another showed it installed the other way! Therefore, assuming yours were as installed from the factory is your picture exactley as you found them when you removed the top mount off the bearing?
Regards
Dave
October 15, 2019 at 5:22 pm
Hi Dave – yes, the pictures show it as it was on my van, and from memory the bearing will only fit properly this way up. It’s probably best to check the orientation of your bearings when you take the old struts out before you fit the new ones, just to be sure. Good luck with the swap, let us know if you run into any issues! Cheers, Dan
October 16, 2019 at 12:24 am
Thanks Dan, much appreciated.
August 27, 2020 at 6:10 pm
Have you thought about replacing the with something more sophisticated, such as perhaps Bilstein Blackhawk E2 TRX (although I’m not totally sure that there is an appropriate version) I have a Hymer B514 on a Fiat Ducato chassis. I would like something that gives better conytol than the standard unit.
August 28, 2020 at 11:41 pm
Hi Graham – I haven’t looked at alternative shocks, to be honest I’ve never had any problem with the performance of the standard units. If you find a suitable upgrade let us know – it could be interesting! Cheers, Dan
September 22, 2022 at 12:47 pm
Hi, I know this is an old article but would you know what shock absorbers you fitted.
September 27, 2022 at 6:53 pm
Hi Nick – I’m afraid I don’t have the details to hand anymore. Nowadays I tend to use auto-doc, if you put your vehicle details into their search function it will bring up lots of options for shocks/struts – just be aware that they tend to group all the payload variants together so you will need to check the details for each listing which should detail if they are only suitable for a specific variant. Hope this helps, cheers, Dan
September 28, 2022 at 7:18 pm
Hi again Nick – update! I actually had the struts removed today as I’m in the process of renewing the springs all round and found the manufacturers info was still visible, here’s a photo:-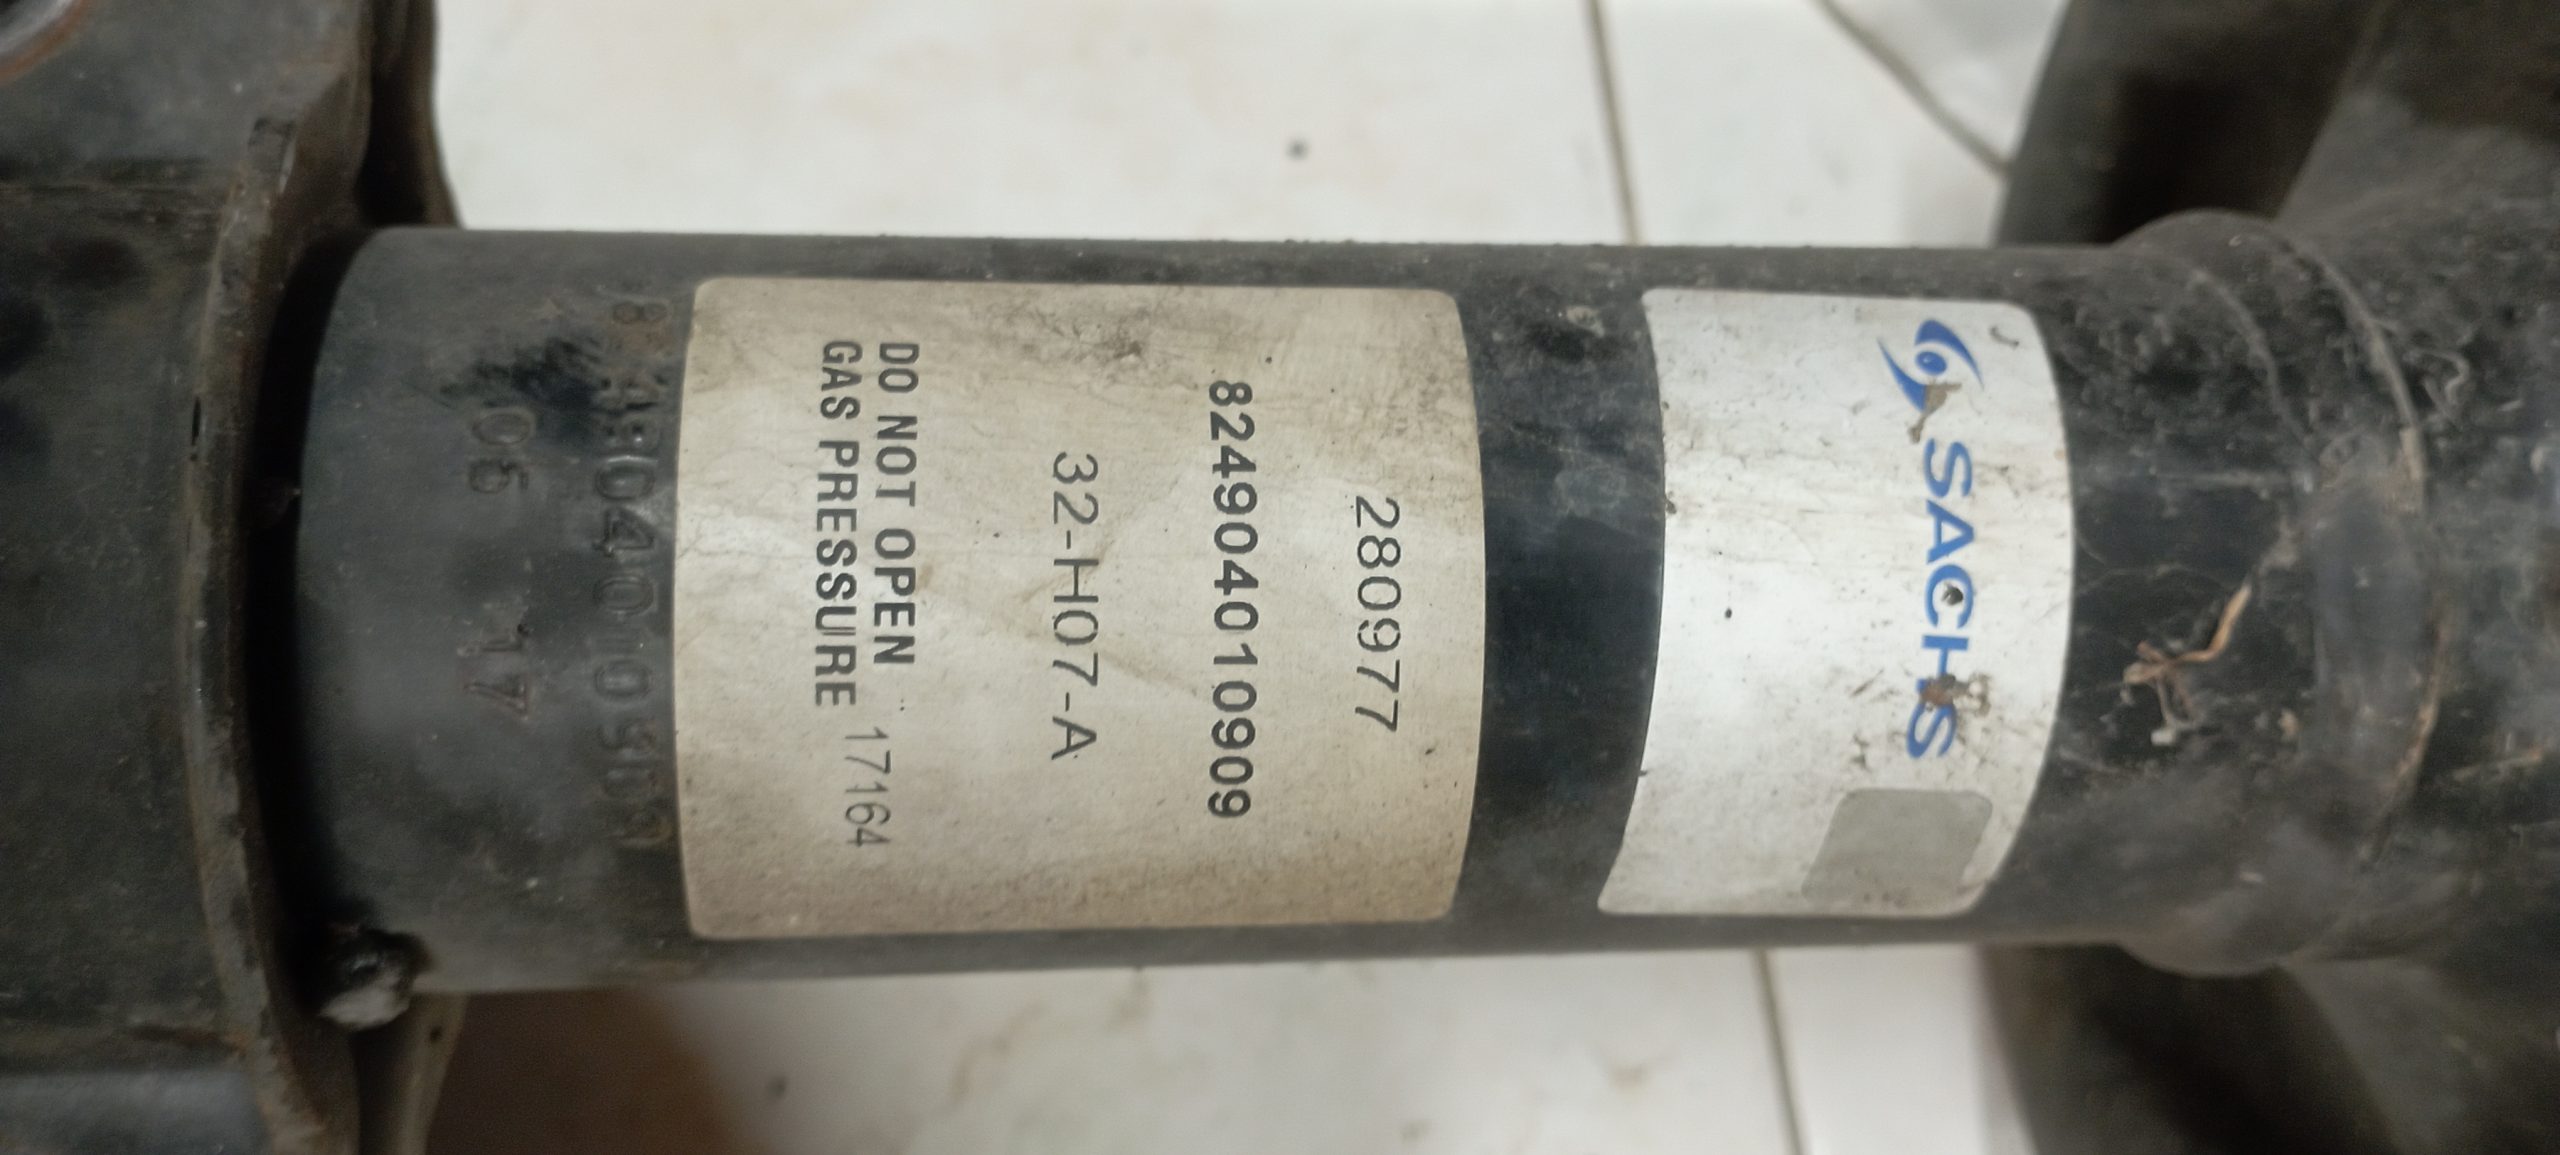
October 30, 2022 at 8:42 am
Thanks for that, I bought KYB struts in the end, hopefully fitting them tomorrow.
I’ve also used Kilen heavy springs
October 30, 2022 at 1:39 pm
Hi Nick, no worries – good luck with the work! 🙂